How to block websites on iPhone
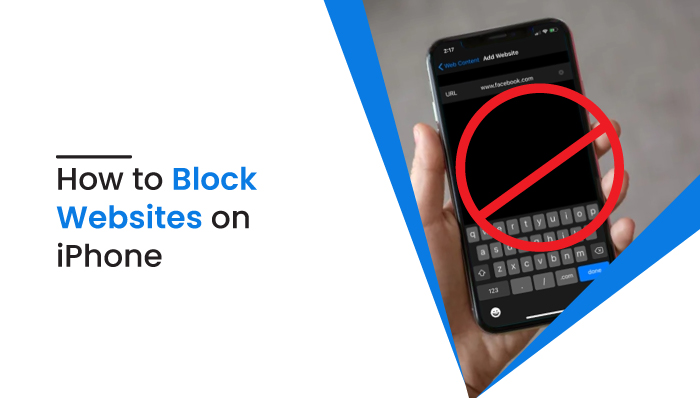
How to block websites on iPhone
With just your iOS device, you can block many different websites without installing any third-party applications. Or you can manually add the URLs for the websites you wish to block. These restrictions work perfectly on every browser, so you need not worry about it anymore. Let’s dive into how to block websites on the iPhone.
By blocking any specific websites on your kid’s iPhone, you will surely have more control over the content they watch or search online. iOS also has a feature of blocking adult content. It is often used to block unusual content on kids’ devices and keep them away from such content.
Table of Contents
How to block websites on iPhone
- iOS 12 to iOS 14
- iOS 8 to iOS 11
- Restrict web browsing to approved sites only
How to block websites on iPhone in iOS 12 to iOS 14
The best part is that iOS has built-in tools which control what websites your kid visits. Adults can easily block access to any particular website, protected by a passcode. Furthermore, the kids can’t change the passcode, so there is no way they can change the settings at all. Here’s how you can block websites on iPhone (iOS 12 to iOS 14):
- Open the Settings from the iPhone Home Screen
- Click on the Screen Time
- Choose Content & Privacy Restrictions from that list
- After that, you can enter a 4-digit passcode to keep it all safe; only you’re instructed to do so. With the help of a passcode, there is no way your kid can change the restrictions you’ve set so far.
- Turn the Content & Privacy Restrictions on. Passcodes may need to be entered.
- Select the Content Restrictions option
- Tap on Web Content
- Select the Limit Adult Websites after that
- Exit the application so as to save the settings. You’re good to go now!
How to block websites on iPhone in iOS 8 to iOS 11
To block websites on iPhone in iOS 8 to iOS 11, you can find the feature under the Restrictions settings.
- Open the Settings application
- Click on General
- Tap on Restrictions
- Once you do so, now you can enter a 4-digit passcode to protect the settings
- After making the passcode, tap on Enable Restrictions and enter the passcode again for confirmation
- Click on Restrictions, then on Allowed Content, and select the Websites option
- Select the Limit Adult Content option
- Exit the application now, and your choice will be automatically saved, and the passcode protects it all.
Blocking the adult content this way is helpful, yet you cannot completely rely on it. Apple cannot rate every website on the internet, so it completely relies on third-party rating for blocking purposes. So, it is good but not completely reliable. If you find out your kids are visiting any inappropriate sites, you can further make a list of them and keep them in the unapproved section. This was, you kids can never access those sites without your permission.
Restrict web browsing to approved sites only
Rather than relying on Restrictions only, you can create a list of websites that your kids can only access. You can easily add them to the approved site lists, and your kids cannot access any other websites than these. This hence provides you with more control and is good for your kids. This feature can be found in the Limit Adult Content section, which can be found by following the instructions given above in either section.
Remove websites from the list
Unlike Android, the iPhone is pre-configured with a list of suitable websites for kids. These can be Apple, Disney, Nat Geo-Kids, and many more. You can add or remove any of the websites at any time. Here are the steps you need to follow to delete the sites from the list:
- Go to the restricted websites screen and click on the Allowed Websites Only in iOS 12 or more (Specific Websites Only in iOS 8 to iOS 11)
- Whichever website you’re willing to remove, swipe left on them and click on the Delete button
- You can repeat this process for each site you want to delete from the given list of websites.
Add websites to the approved list
Unlike deletion, if you want to add any particular websites to the approved list, you can do it in no time. Here’s the procedure to do so:
- Scroll down to the bottom where you can find the list of approved websites, then click on Add Website
- You can insert the name of the website in the Title box
- Similarly, in the URL box, you can insert the URL of the website
- To go back to the previous screen, you can click on Web Content or Websites. Repeat this procedure for as many websites as you want to add.
If your kids try to go through any of the websites other than the approved ones, they can see a pop-up message containing “this site is blocked”. This way, they can never access those sites unless you approve it for them. They cannot even do it independently as they have no clue about the passcode you’ve used. So, you can completely rely on this feature.
Final words
Blocking websites that are not appropriate for your kids is very effective as they cannot access those sites at all. Even if they try, they can see a pop-up message saying, “this site is blocked”. So, there is no way they can access these sites. Not just websites, you can also block music (if found any) or in-app purchases to keep your kids safe. Go and try to block websites on your kid’s iPhone today!


 WhatsApp Spy
 Facebook & Messenger Spy
 Viber Spy
 Instagram Spy
 Skype Spy
 TikTok Spy
 Telegram Spy
 LinkedIn Spy
 Twitter Spy
 Youtube Spy
 Photo Spy
 Video Spy
 Calls and Contacts Tracking
 SMS & IM Chats
 Voice Capture
 Image Capture
 Video Record